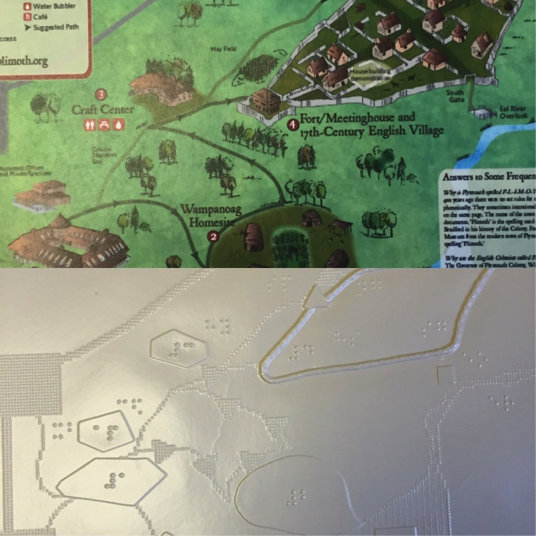
Tactile maps are used to guide visually impaired and blind users in new surroundings like airports, museums, and even cities. Tactile maps use raised points, lines, and textures to represent objects, identify rooms, and denote accessible areas. Creating tactile maps at National Braille Press is a labor-intensive process that requires a keen eye for detail and a steady hand.
Step 1: Transcription
The design of a tactile map starts with a transcriber. Our tactile graphic artist and transcriber, Colleen Rosenberg, explains how the process works:
Whitney: What are your first steps when making a tactile map?
Colleen: When I get a floor plan, I say: What is this for? It’s helpful to know if it’s for orientation and mobility or a student using it in college. Is it for someone who is going to be working at a specific location? Everything needs to be exact. That’s really the most important part.
 Whitney: Tell me more about the art of collage.
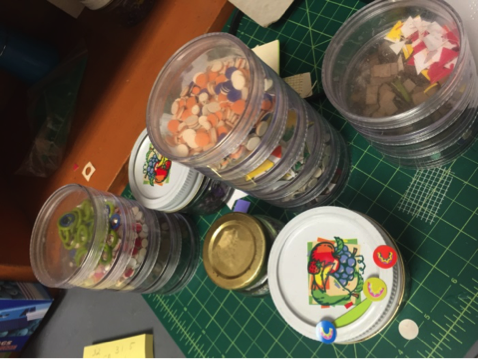
Colleen: You can do a lot of things with collage. Collage is building things up with textures. I use sand paper, dots, string or other materials depending on the map. I then glue a specific texture on to create a raised drawing that can be built higher or lower to differentiate a specific area.
Photo caption: Different art supplies are used to create the tactile map’s raised designs.
Step 2: Proofreading
Once the initial design for a tactile map is created, a blind proofreader ensures it is accessible. Nallym Bravo, who regularly proofreads tactile graphics, explains:
Whitney: What is the most important part of the proofreading step?
Nallym: It’s really important that it is accurate. A lot of tactile maps are crowded with all kinds of tactile sensations. It’s critical for the graphic to be accurate and delineated cleanly so the maps are efficient to use.
Step 3: Reproduction
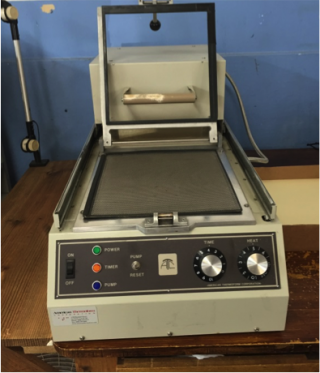
Once the tactile map is found to be accurate and easy to read, we prepare it for reproduction. Jorge Antunes, who works in our finishing department and operates the thermoform machine, explains how:
Photo caption: A thermoform machine used to reproduce tactile graphics.
Whitney: How do you reprint the master collaged copy?
Jorge: The tactile image is placed on a plate, which has a vacuum underneath. I place a thermoform sheet over the original collaged master copy. The machine is closed tightly to create a nice seal. Heat is applied from the top so the plastic will melt. Once this process happens, you have a reprint copy of the master. This creates the tactile graphic.
National Braille Press creates over 100,000 tactile graphics each year including graphics in textbooks, children's picture books, and for organizations wishing to make their information more accessible to blind and visually impaired people. Recently, NBP created tactile maps for the Denver Museum of Nature and Science.